Mini H1 quad retro
Show off your custom retrofit, interior lights, backup cameras, or head units! We want to see how you wired your electronics up! Sponsored by TheRetrofitSource

@ccord10
Posts: 78
Joined: November 15th, 2014
Location: N.Y. Capitol region

Mini H1 quad retro

by @ccord10 » December 7th, 2014

I'm doin my first retro and just thought id post some of my experiences hopefully it'll help someone, but i wont be held responsible if i do something dumb and you copy me :lol: . Any feedback or ideas are welcome and appreciated. i did alot of research and i think i have a good idea how to do it but well see :? .BTW HID Planet and the guides on the Retrofit Source website are a huge help.
So i started by removing the screws and rubber seals and then baking my headlights at 210 for 10 to 15 minutes and then i pry all the tabs out of the clips and then open the headlight starting from the side marker area. now that its open i can remove the reflector. there are 2 clips you can carefully pry them off the stud then loosen the headlight adjuster screw until the reflector comes free.
WP_20141109_003.jpg
WP_20141109_004.jpg

i removed all the screws and attached parts, now its time to have some fun :twisted:
WP_20141109_007.jpg
WP_20141109_005.jpg

User avatar
coolblue
Posts: 211
Joined: November 7th, 2014
Location: Washington State

Re: Mini H1 quad retro

by coolblue » December 7th, 2014

Good luck :D

R U doing Quad?
Image
Honda Accord Coupe EX-L I4
Belize Blue Pearl
Instagram • kulblue
Build Thread • CoolBlue™
FaceBook • CoolBlue™

@ccord10
Posts: 78
Joined: November 15th, 2014
Location: N.Y. Capitol region

Re: Mini H1 quad retro

by @ccord10 » December 7th, 2014

Now that everything's apart i'll be using a grinding wheel on my dremel to remove some material so that the shaft of the h1 will fit with the locknut and bulb clip. ill start with the low beam reflector and then do the high beam.
WP_20141113_011.jpg

I could have ground away the whole shaft but i chose to grind away only the center part.
WP_20141113_002.jpg

Now do a test fit to make sure it fits. first i put a silicone washer over the shaft them insert it through the hole and i used a adapter to add support, them finger tighten the locknut (note do not tighten the locknut too much or it will deform and it will not come apart, its meant to deform to lock it into place during final assembly) then i put the bulb clip holder no to test fit.
WP_20141113_006.jpg

Im using the vertical lines in the reflector to clock the projector. i was told that it should be perfect or close to it by doing this . ill check alignment before i tighten it down to make sure its clocked right.

@ccord10
Posts: 78
Joined: November 15th, 2014
Location: N.Y. Capitol region

Re: Mini H1 quad retro

by @ccord10 » December 7th, 2014

coolblue wrote:Good luck :D

R U doing Quad?

Thanks, yeah i dont know if it was good idea to do a quad for my first retro but im always down for a challenge.

User avatar
coolblue
Posts: 211
Joined: November 7th, 2014
Location: Washington State

Re: Mini H1 quad retro

by coolblue » December 8th, 2014

I might go for Quad you're already there :D
Image
Honda Accord Coupe EX-L I4
Belize Blue Pearl
Instagram • kulblue
Build Thread • CoolBlue™
FaceBook • CoolBlue™

User avatar
mcbtay
Site Admin
Posts: 495
Joined: October 30th, 2014
Location: Atlanta, GA

Re: Mini H1 quad retro

by mcbtay » December 8th, 2014

Hopefully you were able to take advantage of the discount code our sponsor, The Retrofit Source, provided :) I'm going to bite the bullet and do quads soon I think... as soon as I finalize some other mods

User avatar
coolblue
Posts: 211
Joined: November 7th, 2014
Location: Washington State

Re: Mini H1 quad retro

by coolblue » December 10th, 2014

Update?
Image
Honda Accord Coupe EX-L I4
Belize Blue Pearl
Instagram • kulblue
Build Thread • CoolBlue™
FaceBook • CoolBlue™

@ccord10
Posts: 78
Joined: November 15th, 2014
Location: N.Y. Capitol region

Re: Mini H1 quad retro

by @ccord10 » December 10th, 2014

after the projector is where i wanted it its time to fit the shroud. i got the gatling gun shroud, yeah i know its been done to death but i like it. so i put the shroud over the projector for a test fit. it fits great very little trimming will be needed, just a little notch at the bottom to clear the protrusion and i need to trim off the inside tabs for the centic ring so the top of the shroud fits flush with the projector.
WP_20141210_004.jpg
protrusion on reflector
WP_20141210_001.jpg
notched and tabs trimmed
WP_20141210_002.jpg
centric ring fitted

Make sure to trim a little at a time you can always take more off but its real hard to add more to it! now that its trimmed lets see how it fits, im pretty happy with that. ill glue it on during final assembly so it doesnt fall off.
WP_20141120_004.jpg
looks good to me

@ccord10
Posts: 78
Joined: November 15th, 2014
Location: N.Y. Capitol region

Re: Mini H1 quad retro

by @ccord10 » December 10th, 2014

If your doing a low beam only retro then your ready for paint,halos etc. and final assembly. It only took a couple of hours to do this and i have no previous experience, so anyone could do a H1 low beam retro start to finish in a day. i plan on doing a quad with dual halos, demon eyes and painting the housing so i still have a long way to go.
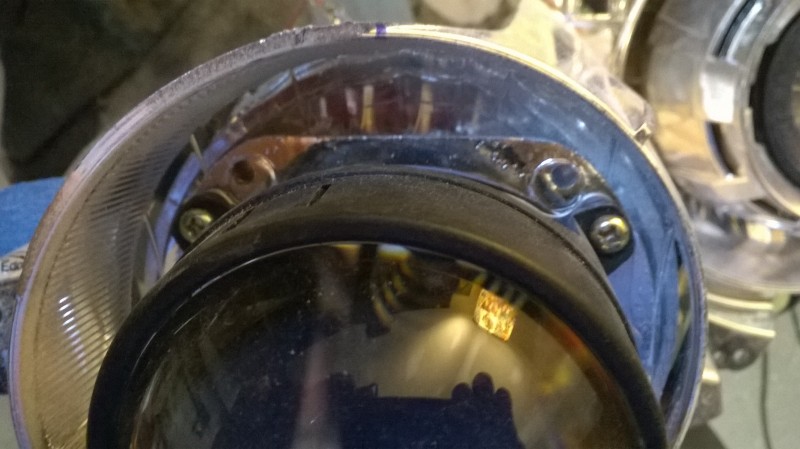
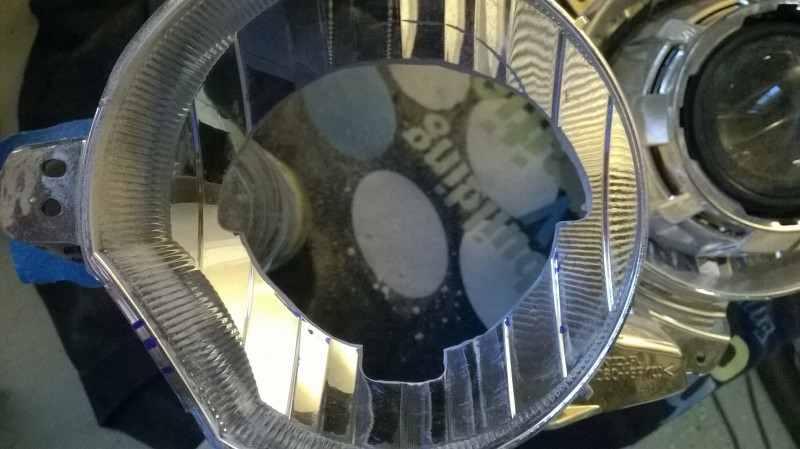
Now on to the high beam reflectors. originally i tried to trim the inside of the shaft like the lows and the projector fit fine but when i checked the clearance with the lens it didnt fit. After comparing other quad retros i realized i had to do alot of trimming to get it to fit well. i ended up having to cut a hole big enough to fit the back of the projector housing through the reflector.
WP_20141207_012.jpg
reflector cutout

i was careful not to trim to much away so that i have enough material to mount the projector, you can see it fits perfectly in the hole with hardly any gap. the notch at the bottom is for the wires to pass through. Also morimotos have a step in the side hence the shape but i also had some generic H1's handy, which are oval, and they fit as well. I want to make a template to make it easier to trim the other side, if i do ill make some scans and post them.
WP_20141207_005.jpg

It took alot of time but i was able to get the projector centered and it sits flush on the reflector lens however i still have to do some minor adjustments to line it up with the other projector before final assembly. I may use the spring and bolt method of mounting so that its easier to make adjustments after its mounted.
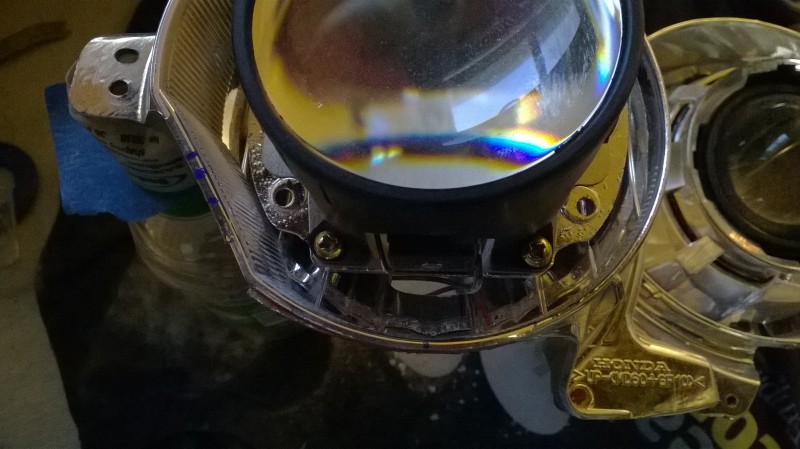
WP_20141207_010.jpg
bottom
WP_20141207_011.jpg
top

now i have to trim the shrouds to fit which is not gonna be easy because the area around the reflector is at an angle and the shroud i chose doesn't fit inside the reflector opening. i could use a mini gatling gun shroud here to save alot of time but i want dual halos and you cant fit a halo inside the mini gat because of the mounting posts.
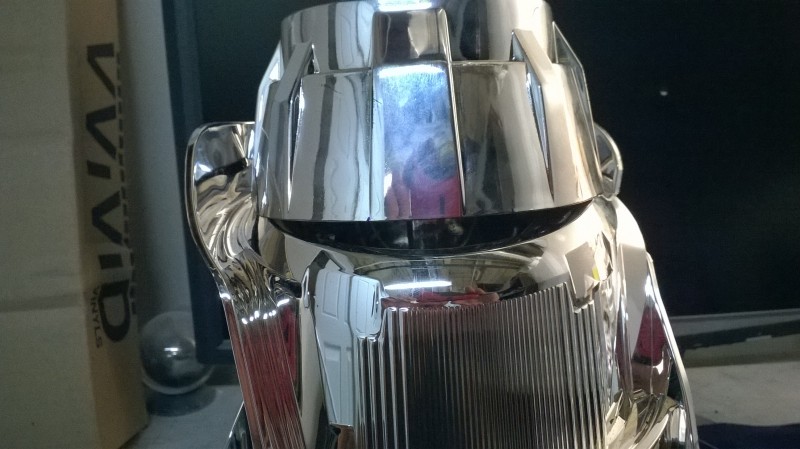
WP_20141120_002.jpg
shot of the angle

@ccord10
Posts: 78
Joined: November 15th, 2014
Location: N.Y. Capitol region

Re: Mini H1 quad retro

by @ccord10 » December 10th, 2014

I did a little test to see how the halos look, im happy with it. what do you think?
WP_20141207_015.jpg

Who is online

Users browsing this forum: No registered users and 27 guests

It is currently April 27th, 2024